B&G Classic: Banana Bread

A classic...

It boggles the mind that I have yet to write about Banana Bread, as it is currently one of the most frequent products of time spent in my kitchen. It is so mind-boggling, in fact, that I had to go back through all my old posts to confirm I hadn’t written a post already and forgotten about it.

For some reason, this banana bread is a huge hit. I don’t know why, since it seems pretty basic, but people LOVE it. It is oft requested by my work peeps and since we get groceries and produce delivered to the office, over-ripe bananas are pretty easy come by. I have everything else on hand most of the time, and it takes maybe 20 minutes of active time to get this recipe together. Regular banana bread making is a no-brainer.

This recipe is mostly Martha’s, with a few B&G adjustments. I like to sub in some brown sugar for some of the white sugar in her recipe because, why not? Brown sugar is delicious and it adds some nice depth.  I also leave out nuts, but sometimes add in chocolate instead because chocolate is delicious.

This is just great, I am not sure if there is more to say about it, because I am pretty sure most of us have had banana bread. If you haven’t had banana bread because you don’t like bananas, I urge you to try it, or get someone else to make it and then try it, because while it is totally banana-y, it is also one of those things that people who hate bananas manage to love anyway, because it’s a different kind of banana-ness. Or if you don’t like it because you’ve only had bad ones, I recommend you try it because this is a good one, and I suspect it will change your mind. It’s very sweet, which I like, but could easily be adjusted if you preferred otherwise. The addtion of sour cream or greek yogurt makes it very moist, and it has great banana flavor. It is a delight when it is still warm, it is a delight when it is cooled the next day, it is a delight when it is toasted, it is a delight as a bed for an ice cream sundae, and I am pretty sure it would be a delight as the basis for a bread pudding, which, now that you mention it, I am TOTALLY going to try pretty much immediately. I am going to leave some of this out to get stale.

Next time you have bananas that got a little too ripe, don’t despair, make banana bread! You will be very popular.

breakfast of champions.

Classic Banana Bread (makes 2 standard loaves or one large tube cake – recipe can easily be halved)

Adapted from The Martha Stewart Cookbook

2 sticks unsalted butter, at room temperature

1 cup sugar

1 cup dark brown sugar (not packed)

4 eggs

3 cups all purpose flour

2 tsp baking soda

2 tsp salt

2 cups mashed very-ripe bananas (about 6)

1 cup sour cream or greek yogurt

2 tsp vanilla extract

1 cup chocolate chunks (optional)

Preheat the oven to 350. Prep two loaf pans or a tube pan with butter or cooking spray, set aside.

Cream the butter and both sugars in the bowl of an electric mixer fitted with the paddle attachment until light and fluffy. (A handheld mixer or by hand would work too!) Add the eggs in one at a time, beating well between each addition. Sift together dry ingredients in a medium bowl and add to the butter mixture, mixing until just combined. Add the banana, the sour cream and the vanilla and mix until combined. Fold in chocolate (or nuts if they float your boat) and pour into prepared pans.

Bake the banana bread in the center of the oven for at least an hour until golden and a cake tester insterted in the middle of the loaf comes out clean. Loaf pans will likely take an hour or an hour and five minutes, tube pan will take about an hour and fifteen minutes.

Enjoy!!

Fall Project: Bacon!

Bacon. Homemade!

Hello my little jellybeans…I have missed you so. It has been crazy around here! Since we have spoken last, the following things have happened:

I have been to CT for a baby shower during a hurricane.

I have started class every Monday night with some colleagues.

I have been to Virginia for a wedding.

I have been to NY for a surprise party.

I ate pig eyeball. I also ate pig brain on a cracker.

I have been hanging out with my new best friend Baby L.

I rediscovered my love for cereal. I know this doesn’t sound like a big deal? But trust me, it’s huge, and kind of problematic. I am now remembering why I don’t keep cereal and milk around all the time. I could eat cereal three meals a day and not get tired of it. Rice Krispies with banana? Raisin Bran? (Kellogg’s. Obv.) Fruity Pebbles? Cap’n Crunch? Kix? I LOVE it. Love. It tends to limit the amount of cooking I do. It also does not include vegetables, so there are serious nutritional holes in the all cereal diet. But so good!

I have been doing new fun stuff at work.

Another baby was born into the family! Welcome Baby Dubs!

I joined the gym again! (Incidentally, took a class this weekend that has rendered me practically immobile. So. Much. Pain. Good pain?)

I finished watching “Friday Night Lights.” That show is AMAZING. I want to go back to the beginning and watch again. Seriously. Amazing.

The following things DID NOT happen:

Much cooking of any kind. A little bit here and there, I guess, but not much. I made some classics and repeats, and supplemented with much takeout, no real adventures.

But it’s fall! Football season! The perfect time for cooking! I feel my groove coming back. Yesterday I made ricotta, and might make some gnocchi later. I also made some tomato soup. I am excited about trying puff pastry, because all butter puff pastry is expensive, and the ingredients for all butter puff pastry are not, so I figured I might as well give it a try. I have a bunch of chicken in the freezer and a bunch of weeknight chicken recipes to try. I have some more projects for these upcoming months…bread, noodles, sausage, duck confit. Lots of plans.

But now, to what you are here for. If you recall, I made bacon awhile back. Every time I have mentioned that, some smart ass has asked if I slaughtered a pig. I did not. I am not allowed to raise pigs in my apartment, my landlord has allergies.

Lucky for me, Whole Foods sells lovely, large pork bellies for just such a purpose, so I got one there and we were off.

Making bacon is perhaps the easiest project ever. It requires almost no work. It takes a little bit of effort to track down the required ingredients, and then it takes about 10 minutes to put together. That’s it. You let it sit for a week in the fridge, and every night when you get home from work, you try to remember to flip the belly over. Literally, that is pretty much all there is to it. Once it has cured for a week you cook it in a low oven or smoke it until the internal temperature is 150 degrees, and voila…bacon! Delicious, porky, flavorful homemade bacon. So fun!

You need pink salt for making bacon. It contains nitrates, which kill bacteria and keep bacon that charming reddish/pink color instead of turning gray like most pork that you cook until well done. They have been vilified, but for no real reason, it seems, since they are not bad for you in the doses you find in cured meats. Plus, though curing bacon to bacteria free levels can be done without it, the risk of poorly cured meats is not something I like to mess with, so I am decidedly pro-nitrate. Gimme an N! Gimme an I! To give credit to the anti-nitrates out there, they ARE poisonous if you ingest too much. And a teaspoon on its own is too much, so keep away from the kids. Also any adults that confuse tablespoons and teaspoons. No one said curing meat wasn’t a job for a responsible adult. As with all things bacteria, you must be careful.

A good basic dry cure is salt, sugar and pink salt. The rest is just gravy. I followed the instructions of Michael Ruhlman, because his post on the subject was what got me wanting to do this in the first place. But I like the idea of including mustard, because I bet that’d be good. I will be doing this again, and stat. Seriously, do it with me. It is so easy. And very impressive. I made bacon!

As it was in the beginning…

Day 1

Day 2

Day 3

Day 6

Day 8 - looks like the real thing!

To keep you updated on things around here…

What I am currently reading: A Man in Full by Tom Wolfe. It is about Commercial Real Estate, and set in Atlanta. Both of these things are wildly relevant to my current job, so I am very much enjoying it.

What I am currently listening to: A lot of playlists. I’ve got a good mellow one, a good regular one, and a good upbeat one for the gym. And A LOT of cheesy pop (see: gym.) Also Otis Redding. There is nothing better than Otis Redding. Except for when I am listening to it through my iTunes and my Otis Redding is followed by Phoebe Snow. Phoebe Snow! SO good.

Home Cured Bacon

1 5lb piece of pork belly, skin removed.

2 ounces (1/4 cup Morton or Diamond Crystal coarse kosher) salt

2 tsp pink curing salt #1

4 tbl coarsely ground black pepper

4 bay leaves, crumbled

1 tsp freshly grated nutmeg

1/4 cup brown sugar or honey or maple syrup (I used brown sugar)

5 cloves of garlic, smashed with the flat side of a chef’s knife

5 to 10 sprigs fresh thyme (optional)

Find a large bag that will hold a 5lb pork belly flat. The 2 gallon Ziploc bags are perfect for this. Mix all of the ingredients for the rub together in a bowl (that would be everything but the belly.) Stick the belly in the bag, and then rub well with the dry cure. Make sure you get it all on there and press it into the meat as best you can. Seal the bag and put in on a baking sheet and stick it in the fridge. Flip the bag every 24 hours or so.

After a week, preheat the oven to 200 degrees (or better yet, get your charcoal grill fired up to smoke it.) Remove the belly from the bag, rinse it under cold water and pat dry. Place on a rack on a cookie sheet and roast in the oven or smoke on the grill for an hour and a half, or until the internal temperature of the belly is 150 degrees. Remove from the oven, marvel at your creation and give yourself a big old pat on the back. You made bacon! You are like a straight up pioneer or something!


In which I make bagels…

So here’s what I did last weekend…

I made those!!

Bagels! I made them! I also had brunch with my Gram and my aunt (the bagels joined us as well) and finally watched The Town. (My apartment is in it! For reals! You have to look quick, but the prettiest blue door in all of the North End is in it! Famous.) It was a low key weekend that was much needed (do you see how few things on that list involve leaving the house…jackpot!)

The bagels, I’ll admit, were stressful. Not, as it turns out, because they were difficult to make, but because I was very afraid that they were going to be difficult, and it wasn’t until they were cooling on the rack that I realized that they actually were not at all, and that I will happily make them again…maybe for Easter (I didn’t do this…oops.)

I also made gravlax to go with them.

brunch

I wanted to make cream cheese too, and really bring this home, but I couldn’t get rennet aside from mail order and I didn’t have time to mail order. Next time.

Anyway, gravlax are cured salmon (note: I do not like smoked salmon. Not. At. All. Why would you take delicious salmon and make it taste like campfire? It boggles the mind. Instead, gravlax are my preferred bagel topping.) I have made them before, so I was not nervous about that. There really is nothing easier. You buy a salmon filet and cut it into two equal sized pieces, mix yourself up a paste of kosher salt, sugar, pepper and vodka (just a splash) and sandwich the paste between the two pieces of salmon with some dill, and then wrap it and stick it in the fridge with some weights on it. (At the Hargraves homestead in CT, you know there are gravlax in the works when there is a large patio rock hanging out in the fridge…not weird at all.) Every twelve hours or so, you take the salmon out, unwrap it and baste it with the liquid that is being pulled out of the salmon by the salt, and in four days you have a two beautifully cured gravlax filets. Sounds like a lot, but trust me, writing about it took more work than making it.

I started the bagels Saturday evening, mix the dough, knead for 5-7 minutes, throw it in the fridge and do something else. (In my case, watch The Town very closely to pick out all of the reasons that Ben Affleck and co. took over my neighborhood for what felt like years two summers ago.) After at least one hour in the fridge, take the dough out, portion it, shape it and stick it back in the fridge overnight. Next morning take the dough out of the fridge, boil those suckers for a minute and a half each, top with the toppings of your choice (onion! sesame seeds! poppy seeds! salt! asiago cheese! whatever you want! except for cinnamon sugar! that one waits until after the bagels are baked!) and then bake them for 20 minutes. That’s it. Voila. Bagels. Good bagels. Bagels that will make you (and hopefully others) smile. Bagels that will impress your friends. Bagels that you will want to make again. Bagels! BAGELS!!

Bagels!

So go forth, make bagels!

Things…

1. Last week, I was suffering from a terrible hormone imbalance that made me at once want to burst into tears, put my fist through my monitor, and eat my own weight in bar food. How this particular hormone imbalance is able to sneak up on me on a fairly regular basis is a testament to something -what I am not sure, but I suspect it is not to my brilliance, I have often spent a good portion of days like this trying to figure out what the hell is wrong with me. Eventually it dawns on me… – but at any rate I went home and made batter fried chicken fingers, honey mustard sauce and french fries (and sat on my couch and ate them by myself while I watched the Celts and cursed the cheerleaders) so I will be talking about that one of these days.

2. Remember how I said I needed more hours in the day? That would actually still be helpful, but what I ACTUALLY discovered is almost as helpful is having less TV in my hours. I miss it though. I had the wrong channel on to watch the Celts last night for a minute (YES, the Celtics were on TV and I watched…I really have been good, but I have bent the rules for an occasional sporting event. It’s the playoffs, I think Jesus will be ok with this?) and I heard the opening of Law & Order SVU and practically had a Pavlovian response. I think TV was an excellent choice for a Lenten sacrifice.

3. Another thing that happened last week: I had to go to the dentist for a temporary crown to replace the giant silver filling that I have had in a tooth pretty much since this particular tooth entered my mouthspace when I was approximately eight. I was thinking, hey, no biggie, I have had a root canal and crown before, I don’t remember it being a big deal (even though I am PETRIFIED of dental procedures, unfortunate, since I don’t exactly have the luxury of strong naturally perfect teeth) until I realized that I was actually so paralyzed with fear before this was to occur the last time that at a visit just prior to the procedure my dentist gave me a prescription for Valium to chill me the heck out, which I was very conspicuously without this time. It may have been pretty apparent when I got there, because he kept assuring me that there was actually nothing to worry about (except for that drill, you mean? Right.) But then he gave me head phones and my choice of like 500 videos and I got to watch Bruce and the E Street Band live in Hyde Park, which was actually totally awesome and helpful even thought I could still hear the drill. Since then my mouth has tasted like metallic potpourri and nothing has helped all day, so I decided that lots of garlic may be the only fix. I made Garlic Scampi for dinner. I will also be talking about this soon.

4. I need to find a British noble family to be a part of so I can be part of society. Not this fake American new money society, REAL society. My new name will be Flossy (not my real name, that will be Beatrice or Florence or something, but my nickname that might as well be my real name because everyone forgets what my real name is – also, fun fact: my French class name in high school was Brigitte but my teacher couldn’t remember and always, ALWAYS, called me Beatrice…) and my last name will be something with a hyphen. And I will wear fascinators on the reg and will have an invite to the Royal Wedding. Actually, Hargraves is a British name, if anybody out there has a spare five minutes, do you mind checking if I may actually be descended from nobility? That could help me out. Also, Hargraves used to be spelled Hargreaves, so you may want to start there. Thanks bunches! Love you, mean it!

5. I just read “Sweet Valley Confidential: Ten Years Later.” IT WAS AWFUL. I mean, it was awesome with a capital A. But I’m not sure who wrote it or who allowed it to be published. I loved every minute of reading it, but I am devastated that professionals in the literary world allowed it to happen.

OK, this is going to take me another eight days if I don’t just get to it…make bagels. Thank me later.

Peter Reinhart’s Bagels (makes 6-8 bagels)

3 1/2 cups (1 pound) unbleached flour (bread or all-purpose)

3 tsp salt, divided

3/4 tsp instant yeast

1 tbl honey or barley malt syrup

1 cup plus 2 tbl water

1 tsp baking soda

Poppy seeds, sesame seeds, dehydrated onion, and other toppings of your choice.

1. By hand, mix the flour, 2 teaspoons salt, the yeast, honey and the water until the ingredients form a stiff, coarse ball of dough (about 3 minutes). If necessary, add a little more water. Let the dough rest 5 minutes.

2. Knead the dough on a lightly floured surface until the dough feels stiff yet supple, with a satiny, slightly tacky feel, 2 to 3 minutes. If the dough seems too soft or too tacky, sprinkle over just enough flour as needed.

3. Place the dough in a lightly oiled bowl, cover tightly with plastic wrap, and place it in the refrigerator for at least 1 hour and up to several hours. Keep in mind that the bagels must be shaped before proofing overnight.

4. When ready to shape the bagels, line a baking sheet with lightly greased parchment paper or a silicone baking mat.

5. Remove the dough from the refrigerator and divide it into 6 to 8 equal pieces. Form each piece into a loose, round ball by rolling it on a clean, dry work surface with a cupped hand; do not use any flour on the surface. If the dough slides around and won’t ball up, wipe the work surface with a damp paper towel and try again – the slight amount of moisture will provide enough “bite” for the dough to form a ball. When each piece has been formed into a ball, you are ready to shape the bagels.

6. Using your hands and a fair amount of pressure, roll each dough ball into a “rope” 8 to 10 inches long. (Moisten the work surface with a damp paper towel, if necessary, to get the necessary bite or friction). Slightly taper the rope at the ends so that they are thinner than the middle. Place one end of the dough between your thumb and forefinger and wrap it around your hand until the ends overlap in your palm; they should overlap by about 2 inches. Squeeze the overlapping ends together and then press the joined ends into the work surface, rolling them back and forth a few times until they are completely sealed.

7. Remove the dough from your hand and squeeze as necessary to even out the thickness so that there is a 2-inch hole in the center. Place the bagel on the prepared sheet pan. Repeat with the other pieces. Lightly wipe the bagels with oil, cover with plastic wrap and place in the refrigerator overnight.

8. Remove the bagels from the refrigerator 90 minutes before you plan to bake them. Fill a large stockpot with 3 quarts of water (be sure the water is at least 4 inches deep), cover with a lid, and slowly bring the water to a boil. When it comes to a boil, add the remaining teaspoon of salt and 1 teaspoon of baking soda, reduce the heat and simmer with the lid on.

9. Thirty minutes before baking, heat the oven to 500 degrees.

10. Test the bagels by placing one in a bowl of cold water. If it sinks and doesn’t float to the surface, return it to the sheet, wait 15 minutes and then test it again. When one bagel passes the float test, they are ready for the pot.

11. Gently lift each bagel and drop it into the simmering water. Add as many as will comfortably fit in the pot. After 1 minute, use a slotted spoon to flip each bagel over. Poach for an extra 30 seconds. Using the slotted spoon, remove each bagel and return it to the lined baking sheet. Continue until all the bagels have been poached. Generously sprinkle each bagel with a topping.

12. Place the baking sheet in the oven and reduce the heat to 450 degrees. Bake for 8 minutes and then rotate the sheet (if using two sheets, also switch their positions). Check the underside of the bagels. If they are getting too dark, place another sheet under the baking sheet. Bake until the bagels are golden brown, an additional 8 to 12 minutes. Remove from the oven and transfer the bagels to a rack for at least 30 minutes before serving.

brunch


Chilaquiles

Only one week between posts? Woo-hoo! I rule!

And IIIIIIII-ey-IIIIIIIIII will always love you...

Chilaquiles are my new best friend. (To those that currently hold that dubious distinction, I hope you are ready for competition…er, company.) Chilaquiles kind of defy definition, except that they don’t because they are a Mexican staple of stale tortilla chips in a chile sauce that is generally eaten for brunch, and I just defined them, except that they are so much more than that. They can be “plain,” they can be done in a red chile sauce or a green chile sauce, the sauce can be tomato based, you can top them with chicken or make them completely vegetarian, or in my case you can top them with some classic favorites, cotija cheese, diced onion, sour cream and avocado.

This is one of those recipes that shouldn’t have sucked me in, but did. I was reading Matt Bites and he takes such pretty pictures, and there were chips! And cheese! And I was intrigued, so I saved it in my recipes link list that gets longer and longer and longer every day, and I picked up some tortillas last time I was at the grocery store, and let them hang out in the fridge until I found a good time to make these. It happened on Sunday.

Last weekend seemed really long, but not in a good way really…I mean, not bad, exactly, just LONG. I had a long night on Friday, both good and less good, and then Saturday I volunteered in the morning and my volunteering job was making lunch for 35 in three hours. I made enchiladas, and they were very tasty, but I was totally beat afterwards…anyway, by the time Sunday afternoon rolled around, I needed a pick me up, and I thought Chilaquiles, even though it is traditionally a breakfast or brunch dish(?) would do the trick.

Oooh-wee, I was correct.

First things first, I made the chips. You don’t technically HAVE to make the chips, but actually, yes you do, because they are so easy, and I can’t even a little bit imagine this with bagged tortilla chips…yeah, no, don’t do that.

Making tortilla chips really couldn’t be easier. And not easy like “shut up Meghan you’re an idiot -fill in the blank here- is not easy it’s super annoying when you say things like that,” easy, it’s actually easy. Heat oil over medium high until it is good and hot in a frying pan a couple inches deep. Cut corn tortillas (taco sized) in quarters. Fry without over crowding the pan. I did eight at a time in a 12″ cast iron skillet, I’d do six at a time in a 10″ skillet. Fry for two minutes or so until they are starting to look golden, flip once, fry for another minute, remove to paper towels and salt. Dunzo. Cooking enough chips for this dish (I started with an 11 oz bag of tortillas which was 12 of them) took me approximately 15 minutes of not hard work. I even drank wine while I did it. Incidentally, if you are looking to impress guests or just to enjoy the heck out of your next batch of guacamole, I would recommend this as well. I mean, sometimes you just want a delicious chip asap, but if you have a minute and your guests aren’t rolling their eyes at you because you are making them wait and all they want is some stupid guacamole for crying out loud, you should try this. Note though, I wouldn’t do this the day before if I was using them for chips and dip, but I would totally do this the day before if I was using them for chilaquiles. So, to that end, next time you are having non-eye-rolling guests, make some for your dips and then make extra for the next day’s breakfast. If you do know some eye rollers, make Chilaquiles for them, perhaps you will get an apology for the eye roll.

Once the chips are done, You just need 15-20 minutes for the rest and you are good to go.

This version, which is the one Matt picked, wisely because it is a Rick Bayliss recipe and I love him (also though? The Rick Bayliss recipe is pretty much exactly what is on Martha Stewarts’s site with absolutely no credit to Rick, and while for somethings she may reign supreme, I SUSPECT she did not create this recipe nor come up with almost exactly the same thing on her own given that the use of chipotles in adobo is different from most other recipes. Sorry Martha, I am going to give credit to Rick on this one, nice try, get your minions in line, they’re getting too big for their britches…)

Anyhoodle, puree a can of whole tomatoes with two chipotles in adobo. You can find them in a can in the Mexican food section of the grocery store (Also, I am adding them to my pantry list from last post. Stock up on them, they’re great.)

Brown onions in oil and then add garlic, then the tomato mixture and reduce for a minute or two…then chicken stock and reduce for another couple more minutes.

browned

simmering

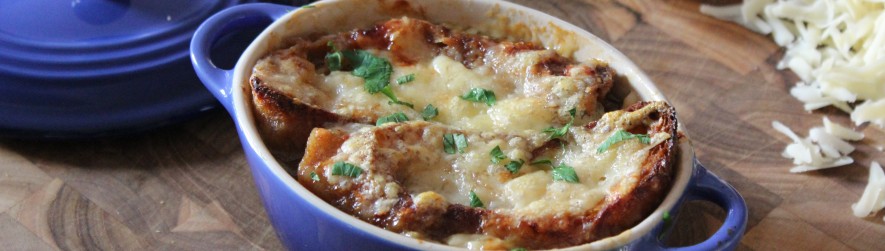
then you add the chips, and that, my friends, is it. Top it with whatever your little heart desires. Cotija cheese, Mexican crema or sour cream, chopped onion and scallions, shredded chicken, poached eggs, the possibilities are endless.

delightful

The chipotles in adobo are spicy and smokey and are really well balanced by the tomato. You have to eat these right away, because the best part is that in between time when the chips get soaked in the sauce and aren’t really crispy anymore but aren’t soggy. The soggy part happens pretty quickly though, so there are no leftovers here. Get them while they’re hot. And make them soon, I promise you won’t be sorry. And use vegetable stock instead of chicken stock if you want to go vegetarian. Easy peasy.

And now, as has become the norm, I leave you with some thoughts.

1. I watched The Fighter. Hadn’t seen it. AWESOME. Great movie. Christian Bale was fantastic, of course, but he will always be Jack Kelly to me. (I have not given up my no tv for Lent quest. I had set the ability to watch a pay per view movie now and again as a parameter ahead of time…)

2. In contrast to the prior weekend, this past weekend was one of those times when I realize just how lucky I am. Between my awesome family and my incredible friends, I have some very very awesome people in my life.

3. Five words for you: Lionel Richie station on Pandora. You are welcome. All thanks go to the Swiamse household for that tidbit.

4. My tournament bracket is destroyed. Notre Dame and Louisville killed me.

5. I need this…or maybe two. That and a $700 camera and I’d be in business. I pick expensive hobbies.

6. I have a pet peeve people. I know you are surprised. I hate the idea of vegan “cheese.” I think it is usally made out of ground pressed nuts. I don’t mind the idea of a spread made out of ground pressed nuts. In fact, if you said “I made this delicious vegan spread with nuts!” I would probably say “ooh, that sounds delightful, let me try it!” But if you say, “hey look, I made vegan “cheese” made out of nuts” I am going to say…”does not compute, not cheese.” I am not saying the spread wouldn’t be delicious, but I am fairly confident it would not be similar enough to cheese to make me think I am actually eating cheese, in which case, I will be disappointed. And I know that people say it DOES taste like cheese, but I don’t believe it. There is not a snowball’s chance in hell that ground nuts in any form are going to taste like Goat Gouda. I’m just saying, don’t call it cheese.

And now, as I continue to plow through life leaving offence in my wake, It’s probably time to wrap this up…

Chilaquiles (serves 3-4)

(adapted from Matt Bites)

1 can of whole tomatoes (28 oz), drained with 1/4 cup of the liquid reserved

2 whole chipotles in adobo

1 ½ tablespoons vegetable oil

1 large onion, three-quarters sliced thinly, one-quarter in a fine dice

1 garlic clove, finely chopped

1 1/4 cups chicken stock

8 ounces tortilla chips

¼ cup Cotija cheese

1/3 cup sour cream or Mexican crema

¼ cup green onions, thinly sliced

salt and pepper to taste

Toppings of your choice (shredded chicken, avocado, eggs, cilantro, chorizo, pickled onions, steak…I could go on and on.)

If you’re making your own tortilla chips, simply fry pieces of corn tortillas in hot oil until golden brown and then drain on paper towel.

In a blender, add the canned tomatoes and the reserved liquid and the two chipotle peppers. Blend until smooth.

In a large deep skillet (I used my high sided saute pan, a cast iron skillet is probably not deep enough,) heat the oil and the sliced onion (not the green) and cook over high heat until browned, 7-8 minutes (since it’s over high heat pay attention here so they don’t burn.) Add the chopped garlic and cook for 1 minute. Add the tomato and chipotle puree and simmer for about 5 minutes, until thickened. Add the chicken stock and boil the sauce over moderately high heat until it reduces a bit, 2-3 minutes. Remove from heat and season with salt and pepper.

Gently stir the tortilla chips into the chile sauce, making sure they’re totally coated in sauce. Top the chips with the diced onion, the green onions, a sprinkle of cheese, a dollop of sour cream or crema and your chosen toppings. Eat these right away, they are not good once they are too soggy. You are going to like these a whole lot.

In which I praise the egg…

The incredible edible egg.

As far as breakfast goes, I am usually over it. Don’t get me wrong, I am always hungry immediately upon waking, but I generally want to skip the breakfast food, and head right to sandwiches and the like. Pancakes are good, especially when my dad makes them into our initials like he did when we were younger, and I like syrup when I have sausage or bacon to dip in it, but 99 times out of 100, I prefer savory breakfasts to things like waffles and french toast. BLTs had been pretty much my perfect breakfast. Enter the egg.

I love the runny yolk. I like scrambled eggs, when they are made with heavy cream particularly, but my favorites are sunny side or soft-boiled. Until I discovered poached. I don’t know what took me so long, but now I can’t get enough. Behold:

poached egg on toast with sweet onions and hot soppressata

pan roasted asparagus with miso butter and a poached egg

leftover onion tart with hot soppressata and a poached egg

corn cake with black beans, cotija cheese and a poached egg

poached egg on toast with sweet capicola

poached egg with boiled kale and garlic toast

Catch my drift? Love, love, love. Adding a poached egg can make disparate leftovers a meal, adds a protein with a built-in sauce, and it looks so pretty! Most of the above are based on leftovers of one sort or another. In fact, my obsession with poached eggs stemmed from leftovers. During free week actually. It all started with the first picture. I had soppressata and melted onions, and I added toast and an egg, and ate it probably three times that week. And the floodgates were opened. I used the leftovers from my vegetarian meal, which I have not yet posted about, for the corn cake and black beans, I used the leftover onion tart I made for bookclub with an egg for breakfast the next day.

The asparagus and miso butter and the boiled kale and garlic toast were both a bit more adventurous. The asparagus dish came out of the Momofuku cookbook that I got for Christmas. The miso butter is a revelation. Fitting, coming from one of the most exciting cookbooks I have ever read. I only had it with the asparagus and egg thus far, but I can’t wait to have it with steak. It is pretty simple, really. You mix softened unsalted butter with white miso, pan fry some asparagus in butter, and add a poached egg. and it is gooood.

David Chang is my hero.

The boiled kale came about because I wanted a poached egg for dinner the other night, and I needed a vehicle for it. I had some bacon, so I thought about a frisee salad, but was immediately bored. I know they are supposed to be great, and one of these days I will make one, but frisee just makes me think of a sad excuse for lettuce, and I wasn’t interested. The blogosphere is all a flutter with talk of kale. I feel like every blog I have read in the past month or so has had a post waxing rhapsodic about kale, cooked until soft, made into soup and baked into crunchy chips (which I have made, they are good) and I thought maybe that would be a good hearty base for my poached egg dinner. Easy, no muss, no fuss, and tasty. Oh my gosh was I right.

I rinsed the kale, removed the stems and any particularly woody ribs, and tore it into pieces. I sautéed bacon, removed most of the fat, added a bit of olive oil, a couple of sliced cloves of garlic and a whole shallot, sliced thin. I let the onions and shallot soften for a minute or two, added the kale and let it wilt. When the kale had wilted, I poured in two cups of chicken stock, brought it to a boil, reduced the heat and let it simmer, covered, for about 20 minutes. At the end, I made a last minute decision and it changed everything. I sprinkled the kale with salt and pepper, and then splashed in about a tablespoon of sherry vinegar. This was AWESOME. I toasted a piece of bread, rubbed it with a clove of garlic and some butter, piled on the kale and added the egg. The garlic toast and the sherry vinegar put this over the top. It was surprisingly good, I was so excited.

Surprise! You might like kale...

Basically what I am trying to say here, is that eggs make a lot of things better. And poaching an egg is easy. I fill a medium saucepan about half way with water. I add a pinch of salt and a splash of vinegar. Plenty of sources say to do it that way, the ultimate source, Harold McGee says it is unnecessary, but I have done it both ways, and I prefer to add the vinegar. Feel free to experiment as you wish. I heat the water over medium heat until it looks about like this:

perfect for poaching...

I crack the egg into a ramekin, and then I use a wooden spoon to gently create a slow whirlpool in the water, and then slip the egg into the water. The egg takes about three minutes to poach, the white will be firm and set, and the yolk will be runny and delicious, and hopefully look just like this.

perfectly poached

But usually it looks a bit more motley. The fresher the eggs the more cohesive the white, but usually when you put the egg into the water, some of the thinner white will set right away and look kind of wispy. The fresher the egg the less of the wispy stuff there will be. I usually just spoon it right out.

So there you have it. I have been eating eggs these days. And enjoying it. Here is the recipe for the kale. Because I couldn’t consider myself a food blogger without adding to the cacophony:

Boiled Kale with Bacon (serves 2-3)

3 slices of bacon cut into lardons

1 tbl olive oil

1 large shallot, sliced thin

2 cloves garlic, sliced thin

1 bunch kale (about 8 oz.)

2 cups chicken stock

1 tbl sherry vinegar (or to taste)

salt and pepper to taste

In a high sided saute pan over medium heat, brown bacon until crispy and fat has rendered. Remove bacon from pan, and discard all but two tablespoons of rendered fat. Add the olive oil to the pan with the bacon fat, and reheat over medium. Add garlic and shallots and cooked, stirring, until softened, about 2 minutes. Add kale and a pinch of salt and pepper, and let kale wilt. Add chicken stock, bring it to a boil, reduce heat and cover, letting kale simmer for 15-20 minutes, until kale is silky, but before it gets mushy. The kale will lose the bitterness, and should taste rich. Turn off heat and add sherry vinegar. Sprinkle the bacon pieces over the top and serve as a side or over garlic toast with a poached egg for dinner.

In which I make The Eggs…

This is for Sarah…

This is NOT for the faint of heart, or for those suffering from high cholesterol. And after eating these, I may be one of them.

I not a huge breakfast food person. There are days when I want some pancakes, and some days when eggs would suit well, but most days, a grilled cheese or a blt beats breakfast hands down, no matter what time of day. However, when I have the gang over for breakfast, I know that breakfast food is required, so I break out my “secret” eggs. People swoon. They are pretty tasty. Tasty enough, in fact, that I had them for DINNER last night. There is a first for everything. I have discovered that when I make these for the gang, it creates a mood of well-being (or lethargy??) so grand that everyone hangs around all day watching movies and taking naps, and when I am really lucky, ordering obscene amounts of chinese food and sushi before we all call it a day. It is heaven. This has happened more than once. They are truly my secret weapon.

Last night I found myself facing down the demons that were the glasses left over from New Year’s Eve. (Please don’t count days since New Year’s Eve. I am embarrassed.)

terror alert at level orange

How many weekends of sadness will I have to endure before I realize that until I have a dishwasher, paper or plastic should be the drinking vessel of choice? This is frightening, and every time I see it I become so dejected I burrow back into the couch for another hour of television. Which is very anti-resolution of me. Anyway, because I was hungry, but could not in good conscience make a dinner mess when the glasses were still mocking me, I decided on eggs. No muss, no fuss, and totally filling. Though I do not recommend eating these by yourself, lest you immediately drop to the floor with a heart attack. You may need someone to call 911.

Three basic ingredients. Eggs, cream and butter. Five if you count salt and pepper. Six or seven if you add herbs or some kind of cheese. The scary part is the proportion of these ingredients to each other. The reason these are so good is their very creamy custardy texture. Which requires cream, obviously. I did this last night just for me. I used four eggs and a 1/4 cup of heavy cream. There were more than I could eat. I would suggest that tripling this would easily feed four.

Eggs and cream whisked together.

looks harmless enough...

Then butter (2 tablespoons of shameful shameful delight) is melted over medium low heat.

slow and steady...

Please note, and this is VERY IMPORTANT, once the butter is melted, the heat must be turned down to low before the eggs are added. Pour in the eggs and cream, and start stirring.

stir and scrape.

Pretty immediately you want to start stirring the eggs and scraping the bottom of the pan with a (heat proof) rubber spatula. What you want to avoid is crusty overcooked eggs forming on the bottom layer, so stir and scrape to avoid this. It will start to look like this.

curdly...

And then you will continue to stir and scrape, and add salt and pepper to taste, and it will look like this.

peppery...

And then you stir and scrape just a little longer. I like my eggs loose and not cooked too much at all, so when I am finished, they still look wet and like they could cook just a little bit longer. But they are delicious.

finished.

I toasted up a couple of slices of ciabatta that I had in the freezer, hit the eggs with another sprinkle of salt and some chopped tarragon (have you ever had tarragon with eggs? Dreamy.) and poured myself a glass of 2008 Cotes de Luberon left over from NYE and I was set. Dinner was served.

breakfast for dinner

And the strangest thing happened. While I was cooking up my eggs, I got the most overwhelming urge to read Henry James. Don’t hate me. That sounds so pretentious I want to punch myself in the face, but I assure you, it doesn’t happen, well, ever, and it was the most bizarre thing. Not just the urge to read, the actual desire to read Henry James specifically. I have never even read more than parts of anything James wrote, but I do have Henry James on hand, so I promptly sat down and read Daisy Miller from start to finish. And it made me want to say things like “I should like to know blah blah blah” or “I wished to beg you to cease your relations with so and so.” I am confident the cosmos are tired of my being a lazy, slothful tv watching bum, and want me to stick to my resolutions, because not only did I have a hankering for Daisy Miller, but apparently there was a House marathon on Bravo yesterday that I didn’t even know about…how I missed it, I do not know, but I did. Victory!

And now, with great sadness, it is time to return to reality, and start thinking about that little thing called work, that I managed to pay minimal attention to for 10 whole days, and is now filling me with feelings of dread and despair. Blerg.

Scrambled Eggs (serves more than one, triple this to serve 4)

4 large eggs

1/4 cup heavy cream

salt and pepper to taste

2 tbl butter (do NOT triple this if you are multiplying the recipe. That would be appalling, 3-4 tbls will be MORE than enough.)

chopped tarragon (or herb of your choice, but try tarragon) for serving.

Whisk together the eggs and heavy cream. Melt the butter in a 10″ (nonstick would be ideal) frying pan over medium low heat. When butter is melted, reduce heat to low and add egg mixture to the pan. Stir the eggs and scrape the bottom of the pan with a rubber spatula, until the eggs begin to set and form fluffy curds. For large quantities this could take more than 10 minutes. Remember, quality, not speed. When eggs are almost cooked to your liking, add kosher or sea salt, and pepper to taste. Feel free to add goat or various other cheeses at this point too, if you feel the urge. When the eggs are cooked to your liking, spoon onto a plate and sprinkle with chopped herbs of your choice. Enjoy.

Oh the greatness that awaits...

The rare sweet breakfast treat – Vanilla Pancakes with Blueberry Syrup…

DSCN3066

blueberry syrup.

I don’t like real maple syrup. It doesn’t do anything for me, and I just don’t really like it. I like the fake stuff. Log Cabin, Aunt Jemima, full of corn syrup and other nastiness, and resembling real maple syrup about as closely as margarine resembles butter, or nacho Doritos resemble actual nachos. But I can’t help it. It’s what I like, even though I know it is totally uncivilized. Since I can’t exactly talk about making pancakes on this blog if I cover them in fake maple syrup, I decided to forgo the “maple” altogether, and come up with some other delightful topping for my Sunday morning flapjacks.

I had blueberries in the freezer, and some simple syrup in the fridge, so I put those over a low flame, along with a splash of Nantucket Nectars lemonade, since I didn’t have any lemons, and I needed some tang. That lemonade is pretty tart, so I went with it. I cooked it down until it was syrupy, and put it aside to make the pancakes.

I use the basic pancake recipe from The Joy of Cooking. They are all pretty standard, milk, flour, eggs, butter, baking powder, most recipes are pretty similar. I wanted to add some vanilla flavor. The recipe calls for optional vanilla extract, but I wanted even more flavor than that, so I boiled the milk with a vanilla bean first, then scraped out the seeds into the milk and let it cool.

DSCN3061

vanilla bean

Then I proceeded with the pancakes as instructed, whisk dry ingredients together, whisk wet ingredients together…

DSCN3067

the perfect pair.

and then whisk the wet ingredients into the dry ingredients.

DSCN3069

nothing to it.

Butter in a  hot pan, then batter in the pan, then voila…pancakes. I like thin pancakes rather than big thick fluffy ones, so I often add a bit more milk than called for in the recipe. The pancakes take two or three minutes on each side until they are brown and cooked through. They each got some butter and then the tasty pile got some blueberry syrup. And I enjoyed the heck out of them.

DSCN3076

scrumpty.

Vanilla Pancakes with Blueberry Syrup (serves 4-6)

For pancakes:

1 1/2 cups all-purpose flour

3 tbls sugar

1/2 tsp salt

1 1/2 tsp baking powder

1 3/4 cups milk

1 vanilla bean

3 tbl butter, melted

2 eggs

1/2 tsp vanilla

For syrup:

2 cups frozen wild blueberries

1/2 cup simple syrup (or half cup sugar, plus 1/4 cup water)

juice from one lemon (or 1/4 cup Nantucket Nectars lemonade)

To make the syrup:

Combine all ingredients in a saucepan, and cook over medium heat, until liquid is reduced and syrupy. Put aside.

For the pancakes:

Heat the milk and the vanilla bean to a boil in a small saucepan. Remove from heat, remove vanilla bean from milk and split lengthways, scraping out the seeds. Return the seeds and the bean to the milk, measure 1 1/2 cups and let it cool, any left over can be discarded. In a large bowl, whisk together flour, sugar, salt and baking powder. In a smaller bowl, whisk together the vanilla milk, the melted butter, eggs and vanilla extract. Add the wet ingredients to the dry and whisk together until combined.

Heat a frying pan over medium heat. When the pan is hot, add butter for cooking, and then use a paper towel to rub the butter on the bottom of the pan and remove the excess. Use about 1/4 cup of batter for each pancake. When the batter begins to bubble and the bubbles pop, the pancakes are probably ready to flip. Flip and cook for another two minutes or so, until golden brown. Remove pancakes to plate, and pour on the syrup. Enjoy!

DSCN3075

I love Sundays.